 USD
USD EUR
EUR GBP
GBP CAD
CAD AUD
AUD
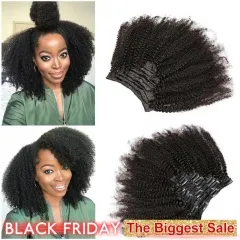
Microlink Hair 101 for Everyday Glam
Microlink hair, often referred to as microbead hair, has taken the haircare scene by storm. In this exploration, we'll delve into the intricacies of microlink hair extensions and understand why they've become a preferred option for many. This is more than just a beauty trend; it's a transformative experience. So, settle in and join us on this journey into the world of microlink hair, where innovation meets style!
What is Microlink Hair?
Microlink hair, also known as microbead hair, is a game-changer in the realm of hair extensions, and here's why.
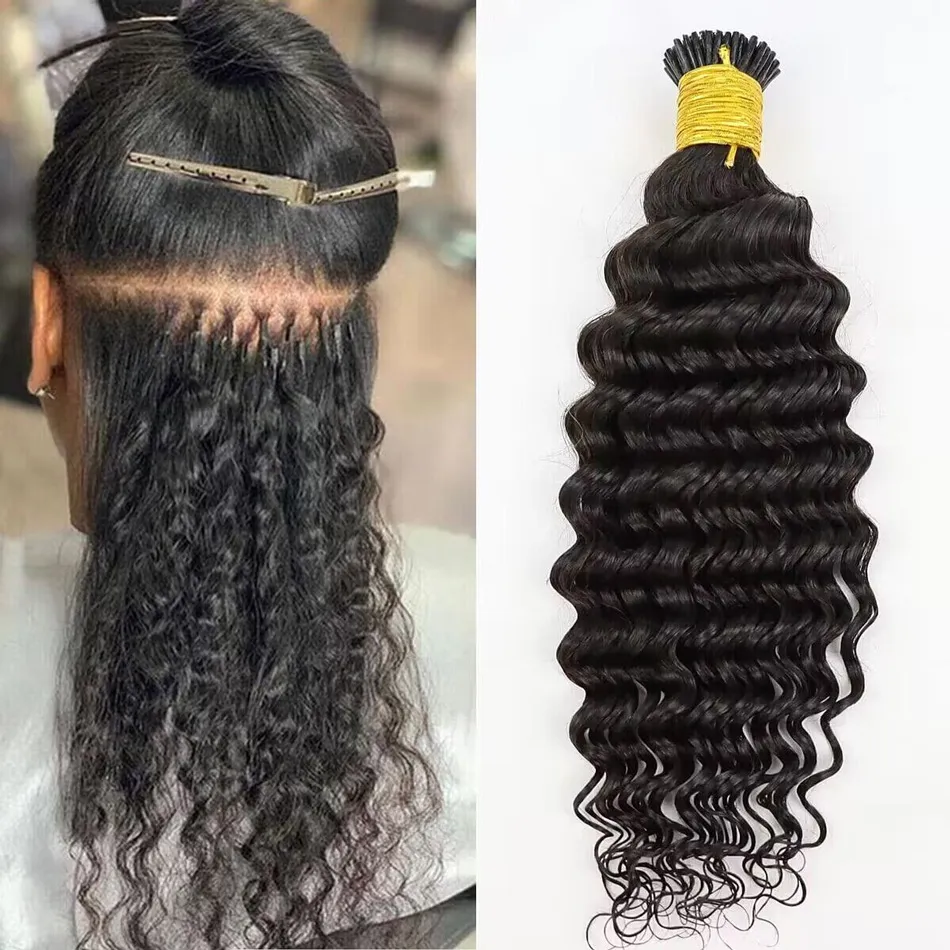
Microlink hair extensions involve attaching individual strands of hair to small, discreet beads or links. The tiny links or beads are usually crafted from metals like aluminum or copper – strong yet lightweight. What sets them apart is the technique – there's no need for heat or glue. Instead, these extensions are secured to your natural hair using small links, ensuring a seamless blend that appears incredibly natural. So, not only do you get that coveted fullness and length, but you do so without the drawbacks of traditional methods.
Advantages of Microlink Hair:
1. Natural Look:
Microlink hair extensions redefine what it means to achieve a natural look. The technique involves attaching individual strands of hair to tiny links or beads, seamlessly blending with your natural hair. The result is a flawless and undetectable appearance – no one will suspect anything other than your stunning, naturally voluminous locks.
2. Versatility:
One of the standout features of microlink extensions is their incredible versatility. Whether you're in the mood for sleek, straight styles, bouncy curls, or a casual updo, microlink hair can handle it all. The extensions move and flow just like your natural hair, allowing you to experiment with various styles without any limitations.
3. Low Maintenance: Say goodbye to high-maintenance hair routines! Microlink hair comes with the perk of minimal upkeep. Unlike some other extension methods, there's no need for extensive daily care. The installation process ensures a secure hold, and with proper care, microlink extensions maintain their stunning appearance for an extended period. This makes them not only a style statement but a practical and time-saving choice for those who want to look fabulous without the fuss.
How Microlink Hair Differs from Other Hair Extension Methods:
When it comes to hair extensions, choices abound, but microlink hair stands out in the crowd. Let's explore how it differs from other popular methods like tape-in and clip-in extensions:
1. Tape-In Extensions:
Tape-ins are a convenient choice, but microlink hair takes it up a notch:
- Attachment Method: Tape-ins use adhesive tapes to attach wefts to your natural hair, whereas microlink extensions employ small links or beads without the need for adhesives.
- Flexibility: Microlink hair offers greater flexibility in terms of movement and styling. The individual links allow for a more natural flow, mimicking the movement of your own hair.
2. Clip-In Extensions:
Clip-ins are quick, but microlink hair adds an extra layer of sophistication:
- Attachment Process: Clip-ins are secured by, well, clips, which can sometimes be noticeable. In contrast, microlink extensions are discreetly attached using tiny links, blending seamlessly with your natural hair.
- Longevity: While clip-ins are temporary and need to be removed daily, microlink hair offers a longer-lasting solution. Once attached, they stay in place, allowing for an extended period of wear without daily adjustments.
Unique Features of Microlink Hair:
- No Heat or Glue: Unlike some other methods, microlink extensions don't require heat or glue during the installation process, minimizing potential damage to your natural hair.
- Seamless Blend: The individual strands attached to tiny links ensure a seamless blend with your natural hair, providing an undetectable and natural appearance.
- Versatility: Microlink hair offers unparalleled versatility in styling, allowing for various looks without compromising the integrity of the extensions.
In the world of hair extensions, microlink hair emerges as a standout choice, offering not just style but a unique blend of convenience and sophistication.

Are You a Perfect Candidate for Microlink Hair?
Microlink hair is generally most suitable for individuals with healthy hair. The extensions rely on a secure attachment to your natural hair, and having a healthy base ensures the longevity of the extensions. If your hair is in good condition, microlink hair can be a transformative and seamless addition to your style.
Busy lifestyles deserve beautiful hair without the fuss. If you're someone who values convenience and a low-maintenance routine, microlink hair is a fantastic fit. The secure attachment method means you can confidently go about your daily activities without constant adjustments or worry about your extensions coming loose.
In essence, if you desire a natural-looking, versatile, and low-maintenance hair solution that complements your unique characteristics, microlink hair might just be the perfect fit for you.
Types of Microlink Hair:
Microlink hair extensions come in various styles, but two major types stand out for their distinct features and application methods. Let's delve into the world of microlink extensions and explore the uniqueness of Bead Weft Hair Extensions and I-Tip Hair Extensions:
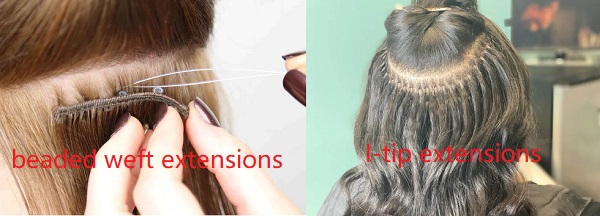
1. Bead Weft Hair Extensions:
Bead weft extensions combine the best of both worlds for a voluminous and seamless look:
- Attachment Method: Bead weft extensions involve attaching a weft of hair to small, discreet links or beads. This method allows for a secure and discreet attachment that blends seamlessly with your natural hair.
- Versatility: With the weft format, bead weft extensions offer excellent coverage and volume, making them an ideal choice for those looking to add thickness and length to their hair.
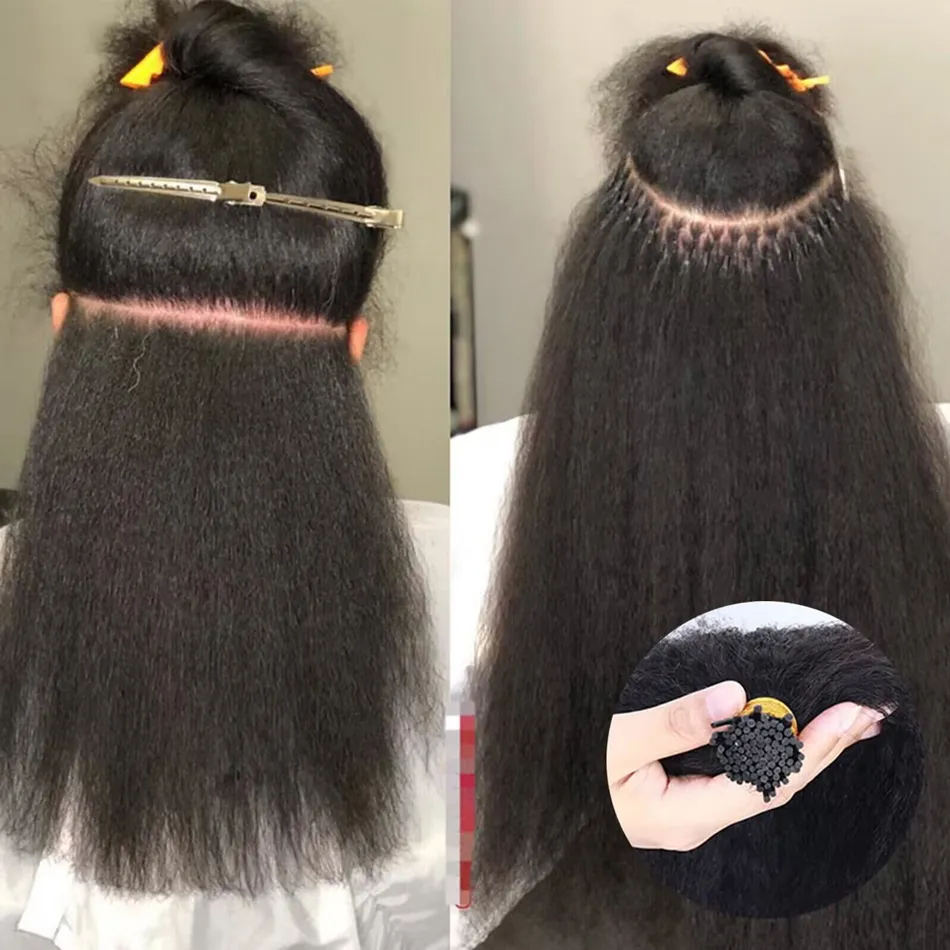
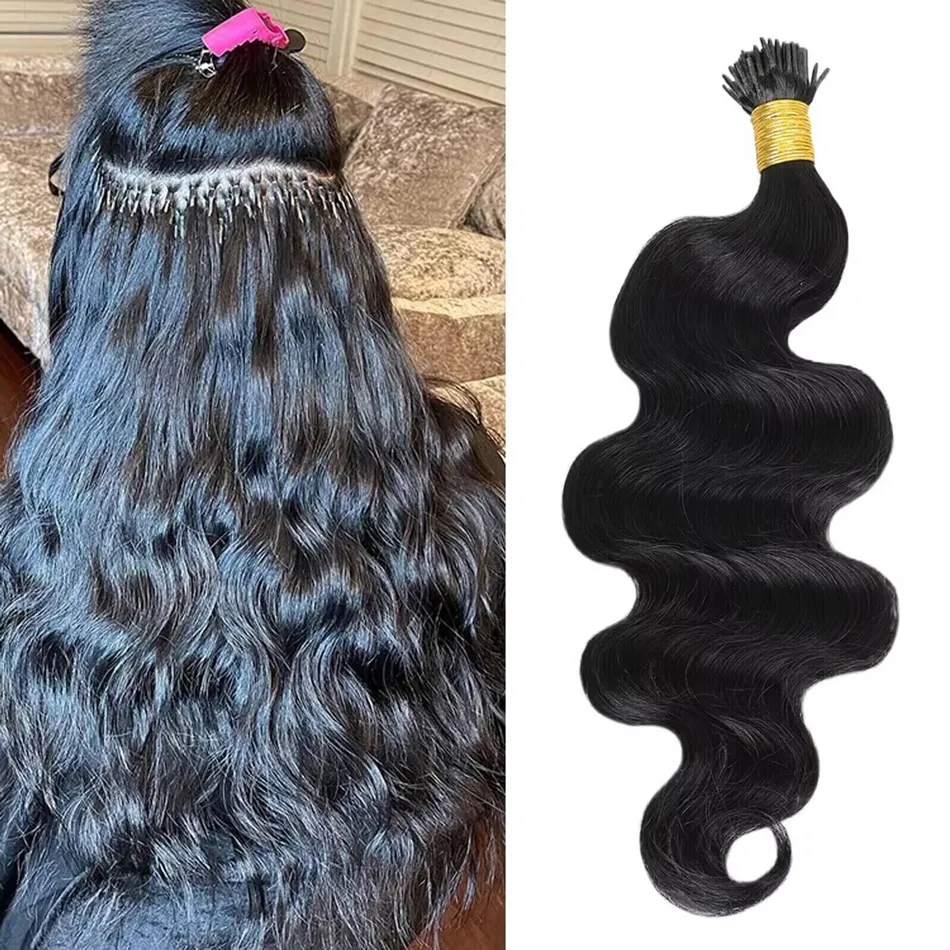
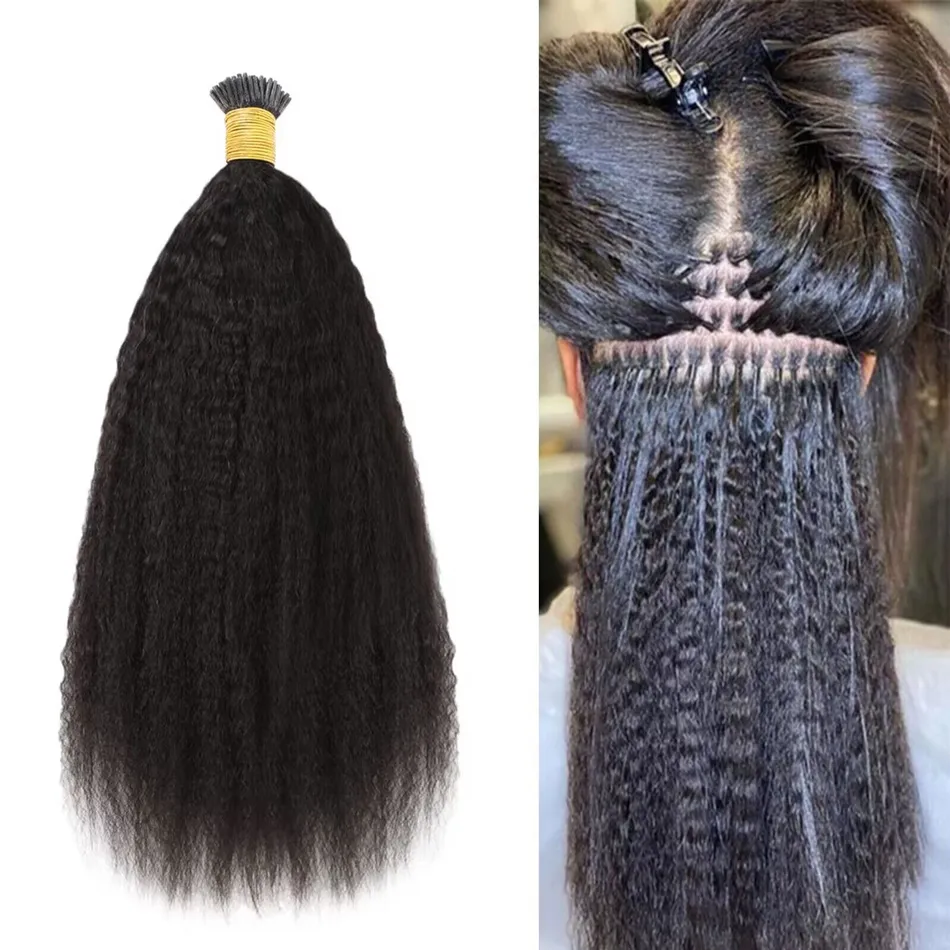
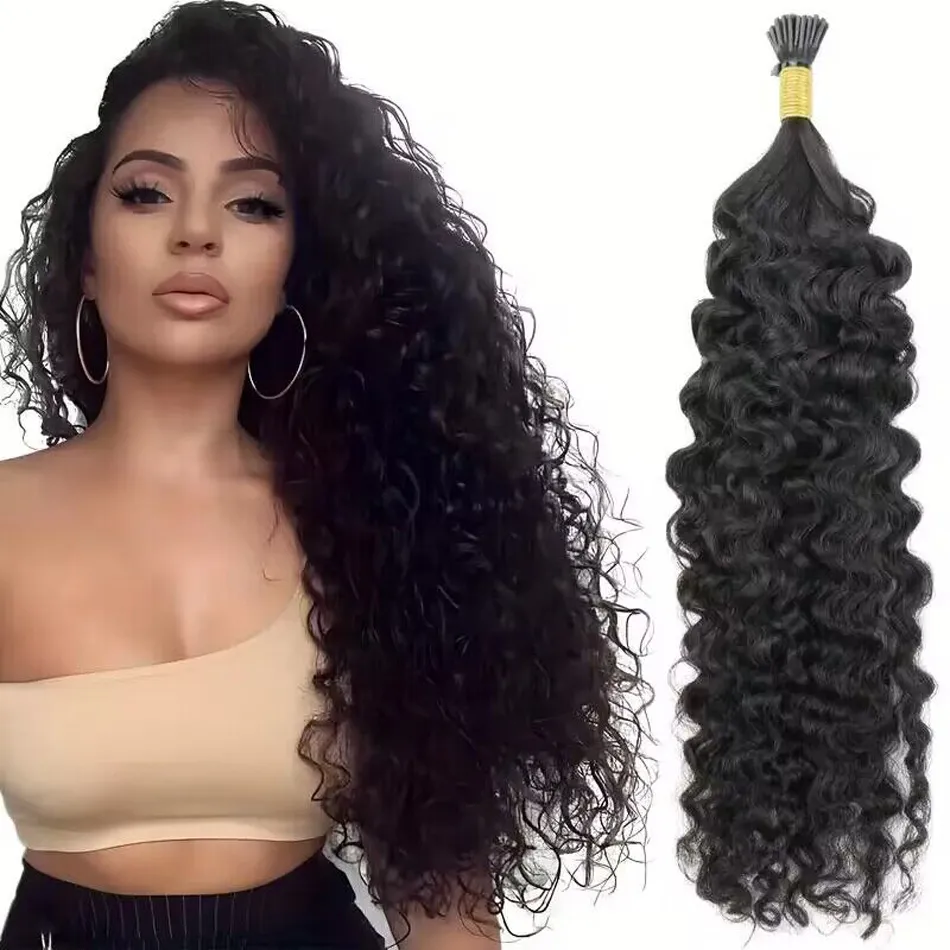
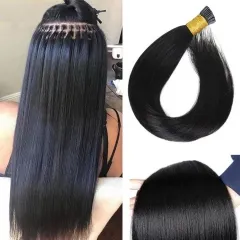
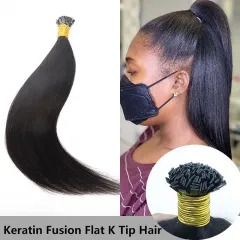
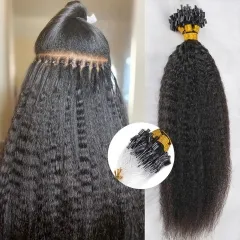
2. I-Tip Hair Extensions:
I-tip extensions provide a more individualized approach for a natural and flexible appearance:
- Attachment Method: I-tip extensions consist of individual strands of hair attached to tiny I-shaped tips. These tips are securely fastened to your natural hair using small links, ensuring a precise and natural-looking application.
- Flexibility: The individual attachment method of I-tip extensions provides unparalleled flexibility. Each strand moves independently, mimicking the natural movement of your own hair. This makes I-tip extensions an excellent choice for those who prioritize a seamless and authentic look.
Choosing between Bead Weft and I-Tip microlink hair extensions depends on your specific preferences, desired style, and the natural characteristics of your hair. If you're aiming for a flawless blend that mirrors your natural texture, I-tip microlink hair might be your ideal choice. For those who appreciate more comprehensive coverage, bead weft extensions offer a fantastic solution. Both types offer a natural appearance and the convenience of the microlink application method, allowing you to elevate your hairstyle with confidence.
Application Process: Bringing Your Microlink Hair to Life
Ready to embark on the microlink hair journey? Whether you're opting for bead weft or I-tip extensions, the application process is where the magic happens. Let's dive into how these extensions are applied, along with some key tips for a flawless transformation:
Bead Weft Microlink Hair:
Step 1. Sectioning the Hair: Start by sectioning your hair to ensure a systematic and precise application. This step sets the foundation for an even and natural look.
Step 2. Placing the Beads: Carefully position the beads along the sectioned hair, leaving enough space between each bead. This spacing ensures that the extensions are evenly distributed for a seamless blend.
Step 3. Securing the Weft: Attach the weft to the beads, securing it in place. The weft should align with your natural hair, creating a cohesive and integrated appearance.
Step 4. Finishing Touches: Once the weft is securely in place, make any necessary adjustments to ensure a comfortable fit. The final result should be a voluminous and natural-looking mane.
I-Tip Microlink Hair:
Step 1. Sectioning the Hair:
Similar to bead weft application, start by sectioning your hair. This step provides a clear canvas for the precise placement of individual I-tip extensions.
Step 2. Attaching the I-Tips:
Take individual strands of I-tip extensions and attach them to small links or beads. This method allows for a detailed and personalized application, ensuring each strand blends seamlessly with your natural hair. Ensure a balanced distribution of I-tip extensions throughout your hair. This contributes to an even and harmonious look.
Step 3. Securing the Links:
Secure the I-tip extensions in place by carefully closing the links. This step is crucial for a secure hold and a natural appearance.
Step 4. Final Adjustments: Once all the I-tip extensions are in place, make any final adjustments to ensure uniformity. The goal is to achieve a flawless, natural-looking result.
General Tips for Microlink Hair Application:
- Professional Assistance: While microlink hair application can be done at home, seeking professional assistance ensures a seamless and expertly executed result.
- Quality Tools: Invest in high-quality microlink extension tools, such as micro-extension pliers, for a smooth and secure application.
- Follow Guidelines: Adhere to the specific guidelines provided with your microlink hair extensions. This ensures that the application process aligns with the intended method for optimal results.
Embark on your microlink hair journey with confidence, armed with the knowledge of a successful application process. Whether you choose bead weft or I-tip extensions, the key is to enjoy the process and revel in the stunning transformation that awaits!
Caring for Microlink Hair: Nurturing Your Gorgeous Locks
Now, let's delve into the essential care and maintenance routine to keep your bead weft or I-tip extensions looking flawless for the long haul. Here are some tips, product recommendations, and techniques to ensure your microlink hair stays as stunning as the day you got it:
General Care Tips:
- Gentle Detangling: Use a wide-tooth comb to detangle your hair, starting from the tips and working your way up. This minimizes stress on both your natural hair and the extensions.
- Avoid Excessive Heat: While microlink hair can withstand heat styling, it's best to use heat tools sparingly to prolong the lifespan of your extensions. When you do use heat, apply a heat protectant to shield the hair.
- Nighttime Care: Tie your hair in a loose braid or use a silk or satin pillowcase to reduce friction and prevent tangling while you sleep.
- Regular Check-Ins: Periodically check the bonds or links to ensure they remain secure. If you notice any issues, seek professional assistance for adjustments.
Washing Microlink Hair:
- Use Sulfate-Free Shampoo: Opt for sulfate-free, gentle shampoos. Sulfate-free formulations are kinder to both your natural hair and the microlink extensions.
- Condition Carefully: Apply conditioner from mid-length to the ends, avoiding the bonds or links. This prevents the conditioner from loosening the extension attachments.
- Avoid Root Contact: When washing, focus on your natural hair and avoid direct contact with the roots where the extensions are attached. This maintains the stability of the links or beads.
- Pat Dry: Gently pat your hair dry with a soft towel. Avoid rubbing or wringing, as this can lead to tangling.
Styling Tips:
- Mindful Brushing: Brush your hair regularly but gently. Hold the bonds or links at the roots to provide support while brushing to minimize stress on the attachments.
- Low Tension Styles: Opt for low-tension hairstyles that don't put excessive strain on the extensions. Loose braids, ponytails, or half-up styles are great choices.
- Be Mindful of Products: Choose styling products that are suitable for both your natural hair and extensions. Avoid products with alcohol, as they can cause dryness.
- Regular Trims: Schedule regular trims to keep your hair looking fresh and maintain a healthy overall appearance.
Recommended Products:
- Sulfate-Free Shampoo and Conditioner: Sulfate-free shampoo and conditioner are gentle on both your natural hair and microlink extensions.
- Heat Protectant: Invest in a quality heat protectant spray or serum.
- Detangling Spray: A detangling spray can make the detangling process smoother and reduce breakage.
- Extension-Friendly Styling Products: Look for styling products specifically designed for hair extensions.
Remember, proper care is the key to a long and beautiful life for your microlink hair extensions. Treat them with love, follow these guidelines, and get ready to flaunt your stunning, well-maintained locks!
Removal of Microlink Hair:
Whether you've rocked bead weft or I-tip microlink hair extensions, the time may come to bid them adieu. Fear not; the removal process is a breeze when done right. Here's your guide to a safe and gentle microlink hair extension removal:
Removal Process for Microlink Hair:
Step 1. Gather the Right Tools: Before starting, ensure you have a specialized hair extension tool, such as micro-extension pliers. These pliers are designed to open the small links or beads gently.
Step 2. Section the Hair: Divide your hair into manageable sections to make the removal process smoother.
Step 3. Locate the Beads: Identify the beads securing the hair. They are usually spaced along the weft, and you'll need to work on each one individually.
Step 4. Open the Beads: Using the micro-extension pliers, carefully open each bead. Use the plier to grip the beads and squeeze them in the opposite way they were installed. This technique releases the bead, allowing the microlink hair to slide out from your natural hair.
Step 5. Slide Out the Weft: Once the beads are open, gently slide out the microlink hair from your hair. Take your time to avoid any pulling or tugging.
Tips for a Safe Removal:
- Take it Slow: Patience is key. Rushing through the removal process may result in unnecessary hair breakage.
- Use the Right Tools: Invest in quality extension tools, including micro-extension pliers, to ensure a smooth and safe removal.
- Seek Professional Assistance if Needed: If you're unsure about the removal process or encounter any difficulties, don't hesitate to seek professional help. A hairstylist experienced in microlink extensions, armed with the right tools, can ensure a safe and gentle removal without compromising the health of your natural hair.
Remember, the key to a successful microlink hair extension removal is care, attention, and the use of the appropriate tools. Treat your hair gently throughout the process, and it will thank you for it!

Conclusion:
Step into a world of effortless beauty with microlink hair extensions, available in bead weft and I-tip options. Discover the charm of natural-looking locks that seamlessly blend with your own hair, offering versatile styling and low-maintenance sophistication.
Visit elfinhair.com for premium microlink hair extensions. Whether you prefer bead weft or I-tip extensions, our curated collection ensures you find the perfect match for your style. Elevate your beauty effortlessly with quality extensions that exude confidence.
Make your dream of luxurious, natural-looking hair a reality. Embrace the magic, embrace the beauty—your journey to stunning, effortless locks begins at Elfin Hair.
 40%
40%
OFF Sale-
$72.76
$121.51(461) (414)

 40%
40%
OFF Sale-
$96.16
$160.59(460) (415)

 40%
40%
OFF Sale-
$72.76
$121.51(461) (389)

 40%
40%
OFF Sale-
$83.29
$139.09(565) (379)

Related Articles:
Effortless Volume Starts Here: Curly Clip-In Hair Extensions
Fine, Medium, Coarse: Which Hair Texture are You?
The Ultimate Guide to Rocking Kinky Hair Extensions
Curly vs. Straight Hair Extensions: Choosing the Perfect Look